Extra tip: When including other git repositories in your own, consider using git submodule (docs) or git subtree (docs). These help you keep the other repositories you include up-to-date and separate from your code. Since we will not be maintaining this code long-term, we do not need to do this for the lab and will use the simpler git clone.
Nodes, Topics and ROS Messages
In ROS, a node is a process that performs a computation. A robot system will usually be composed of many nodes. For example, it is common to have one node per sensor, another node to fuse the sensor data, another node perform localization, another node to perform path planning, another node to handle communication, and another node to command the actuators and engine.
The use of nodes in ROS provides several benefits to the overall system design. First, code complexity is reduced in comparison to monolithic systems, as distinct functionality is encoded in each node. Second, implementation details are well hidden, as the nodes expose a minimal API to the rest of the system. Third, alternate node implementations can easily substitute existing nodes without affecting the rest of the system (even in other programming languages!). Fourth, nodes provide additional fault tolerance, as crashes are isolated to individual nodes. Finally, this modularity simplifies the reuse of code during development (as we shall see in future labs).
In the chair-moving example from the introductory lecture, each participating student played the role of a “node” in a larger system. Two students were “camera” nodes, one student was a “planner” node, and another student directly commanded the actuators. Through this demonstration, each node’s knowledge of the world strictly came from the information that it received from another node(s).
To enable a robot to operate effectively, its nodes need to communicate with each other. One important way of communication is achieved through “topics”. Topics are named communication buses over which nodes exchange messages. Topics have anonymous publish/subscribe semantics. This means that:
- nodes are not aware of what other nodes they are communicating with,
- nodes that are interested in certain data subscribe to the relevant topic for receiving that data,
- nodes that generate data that may be of interest to other nodes publish that data on the corresponding topic,
- nodes are not aware of when such communication may occur – it is asynchronous,
- nodes can subscribe and publish data on multiple topics.
Nodes and topics constitute the basis for the ROS Publish/Subscribe architecture, which is the focus of this lab. However, note that ROS also provides support for services for request-reply communication and actions for requesting operations with intermediate feedback and results. A basic publisher-subscriber architecture would look something like this.

Notice that multiple nodes can publish to the same topic, and all subscriber nodes recieve any messages sent through the topic. For further reading, consider ROS Wiki: Nodes and ROS Wiki: Topics.
Docker Help
If you are having trouble understanding how Docker works, follow this link for plenty of helpful information. This is a great resource – they provide tutorials, diagrams, and more.
Learning Objectives
At the end of this lab, you should understand:
- How to create ROS nodes and packages.
- How to create and use ROS communication channels (topics).
- How to quickly reuse ROS nodes.
- How to create and use launch files.
- How to launch the simulator in the Docker container.
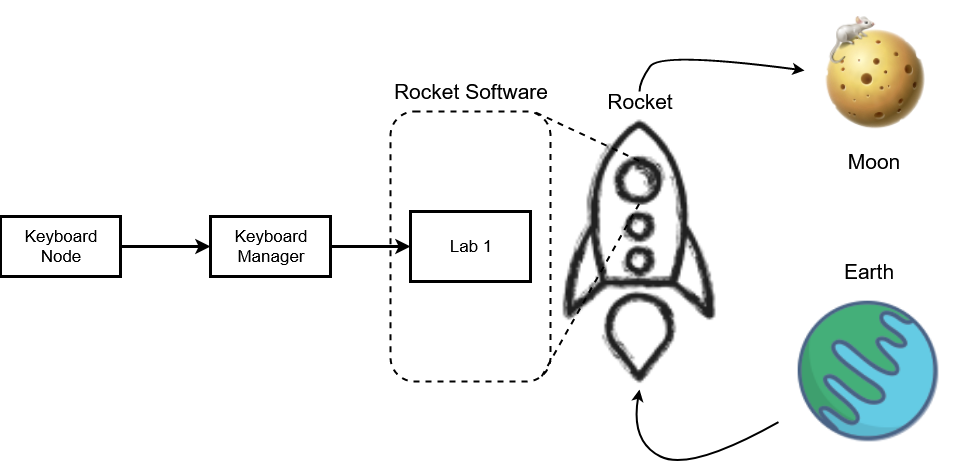
Improving the Rocketship
To begin this lab, we are going to make improvements to our rocketship from Lab 1. First, let’s get the Lab 2 workspace. Remember, a ROS workspace is a folder where you modify, build, and install ROS code. This new workspace contains Lab 1’s code with the modifications you should have made to Lab 1.
Recall that Docker must be started on your host machine to access the Docker container used for the lab. For more information, please refer to Lab 1 Checkpoint 1. To pull the new workspace for Lab 2, run the following in Terminal 1:
cd ~/cs4501-robotics-docker  # edit the location if you did not clone the repository to ~ during Docker Setup
# Connect to the Docker container
docker-compose exec ros bash
# Change to lab directory
cd ~/CS4501-Labs/
# Pull to update the code
git pull
Notice that you now have lab2_ws, which is where we will be doing this lab. This lab is divided into two parts, each with a separate workspace. We will begin in lab2_p1_ws.
In Lab 1, when we wanted to abort the rocket’s takeoff, we had to publish the message via rqt. This was particularly slow and cumbersome. It is reasonable to assume that being able to abort the rocket is vital and therefore should be easier to do. Let’s update our rocket system to abort if a particular key on our keyboard is pressed, as opposed to typing in an separate terminal command.
To do this, we will build two new nodes. The first node will check if a key on the keyboard has been pressed, and then publish a message with a code representing the pressed key. The second node will check the key’s code, and if the key matches some criteria, abort the rocket’s takeoff.
Getting a Keyboard Node
The first node needs to check what key on the keyboard was pressed. This is a common generic task, and thus, there are probably already many existing keyboard nodes for us to reuse. Remember, ROS makes reusing code easy, so if you need to do a common task like processing data from some input device or sensor, someone has already probably done it, embedded into a node, and made it available for others to reuse. A general google search for “ROS keyboard node” returns useful results. One of the first pages we see is: https://wiki.ros.org/keyboard. You can see a screenshot of the webpage below:
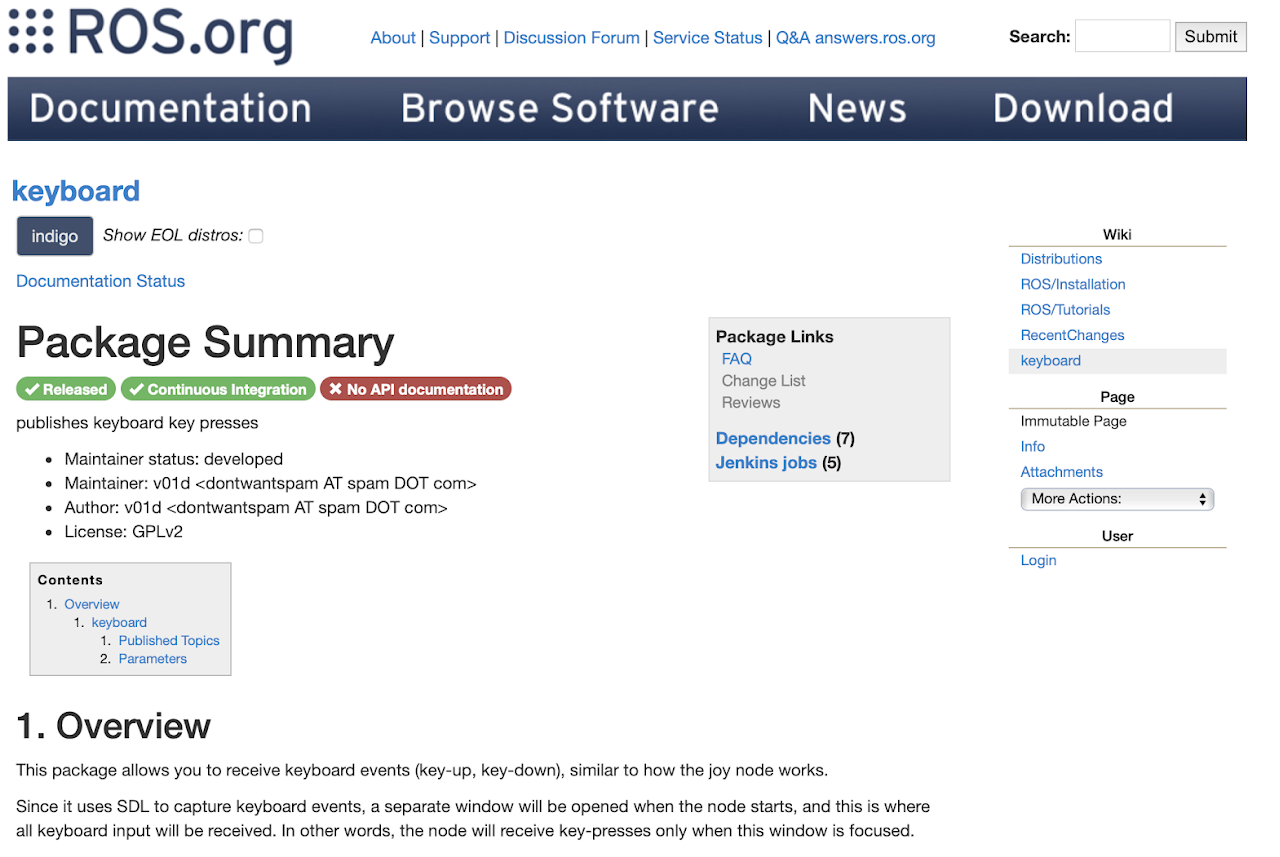
Skimming through the documentation, we pull out three important pieces of information:
- This package allows you to receive keyboard events.
- A separate window will be opened when you start the node, and this is where all keyboard input will be received.
- This node will publish two topics: keydown and keyup
Let’s download this node and see if we can use it. Search the internet for “ROS keyboard node GitHub”. Depending on your search engine, one of the first pages you will see is: https://github.com/lrse/ros-keyboard. You will notice that there isn’t much documentation on the Github page. That means we will need to spend some time figuring out how to use this code, but it looks simple enough to explore it further. Let’s get the ROS package with git and build our workspace. To do that run the following in your Docker container (Terminal 1):
# Go into the source folder of our workspace
cd ~/CS4501-Labs/lab2_ws/lab2_p1_ws/src
# Clone the keyboard package
git clone https://github.com/lrse/ros-keyboard.git
# Go back to the main directory
cd ~/CS4501-Labs/lab2_ws/lab2_p1_ws/
# Build the catkin workspace
catkin build
Next, let’s figure out how this node works. In absence of documentation, figuring out how a node works can often be done by inspecting the code and searching for particular calls to publishing and subscribing to topics, and also dynamically by following these steps:
- Running the node
- Listing the available topics
- Publishing, or echoing topics specific to that node.
In our case, we know from the documentation that the node should publish messages on either /keydown or /keyup, and so we know we need to echo those topics. Open two new terminals and run the following commands:
Terminal 1
# Start ROS in the background. There can only be one `roscore` running at a time, so if you still have it running, skip this step.
roscore
Terminal 2
cd ~/cs4501-robotics-docker  # edit the location if you did not clone the repository to ~ during Docker Setup
# Connect to the Docker container
docker-compose exec ros bash
# Source the ROS setup. This sets up your terminal environment to be ready to run ROS commands
source ~/CS4501-Labs/lab2_ws/lab2_p1_ws/devel/setup.bash
# Run the keyboard source code
rosrun keyboard keyboard
Note: You will be presented with a blank window in your VNC browser (if not open, click here and connect).
Terminal 3
cd ~/cs4501-robotics-docker  # edit the location if you did not clone the repository to ~ during Docker Setup
# Connect to the Docker container
docker-compose exec ros bash
# Source the ROS setup. This sets up your terminal environment to be ready to run ROS commands
source ~/CS4501-Labs/lab2_ws/lab2_p1_ws/devel/setup.bash
# Retrieve information from `/keyboard/keydown` topic
rostopic echo /keyboard/keydown
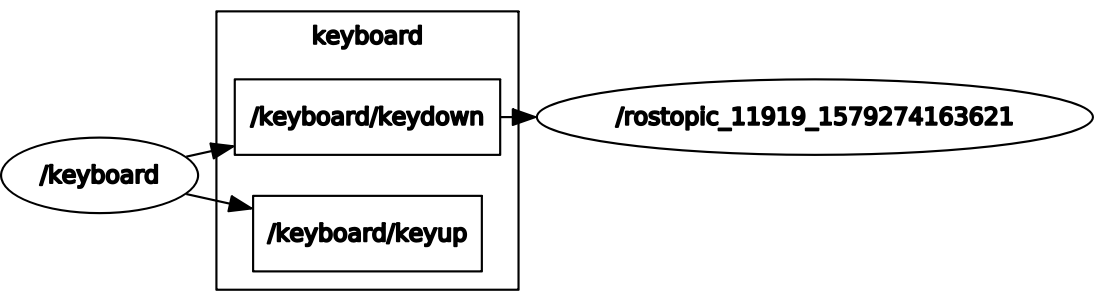
Click on the small GUI window that popped up in your VNC browser and press a key on the keyboard (for instance, press the spacebar). In terminal 3, you should see the following:
header:
  seq: 0
  stamp:
    secs: 1661189918
    nsecs: 324658428
  frame_id: ''
code: 32
modifiers: 0
---
What did we just do? Well, we clicked a key on our keyboard, the ROS node keyboard registered that keypress, and it published a ROS message on the topic /keyboard/keydown. Try pressing other keys and looking at what the published ROS messages are. Below is our computation graph. We can see that the keyboard node is publishing both /keyboard/keydown and /keyboard/keyup topics, and we are echoing one of those topics to standard output.
Note on convention: you will notice that the keyboard node’s topic starts with the keyword /keyboard/. This is because the keyboard node prepends its name to the beginning of the topic. This is something that may help future developers know a bit more about a topic (like the node that is publishing to a channel) but it goes against the anonymity promise that ROS intends to instill. You can do more reading about ROS general naming conventions on the ROS wiki which aims to reduce the chances of name collisions or this ROS question. For the rest of this tutorial, when we refer to /keydown we are referring to the entire topic name /keyboard/keydown.
Creating a Keyboard Manager
Now that we have figured out how the keyboard node works, close it so we can develop a keyboard manager. Close terminals 2 and 3 Note: closing the GUI for the keyboard node won’t kill its process, and thus the GUI will just reappear. To terminate the process, press CTRL+C in that terminal.
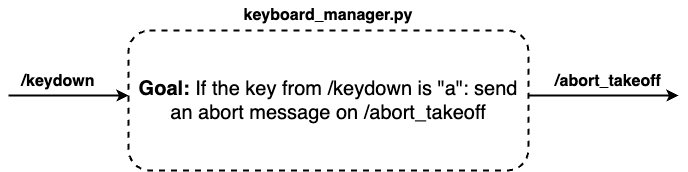
The keyboard manager’s job will be to take the information provided by the keyboard node, interpret it, and then publish appropriate control messages to the rocket (for instance, /abort_takeoff). In our case, we want to check if the “a” key was pressed and then send an abort message. Enter the following into Terminal 1 (close roscore if running, but stay connected to the Docker container):
# Create the keyboard-to-abort manager node
touch ~/CS4501-Labs/lab2_ws/lab2_p1_ws/src/rocketship/src/keyboard_manager.py
# Give the keyboard-to-abort manager node execution privileges
chmod u+x ~/CS4501-Labs/lab2_ws/lab2_p1_ws/src/rocketship/src/keyboard_manager.py
Next, we are going to open the node we just created so that we can edit the content. Open the keyboard_manager.py file in any text editor of your choice.
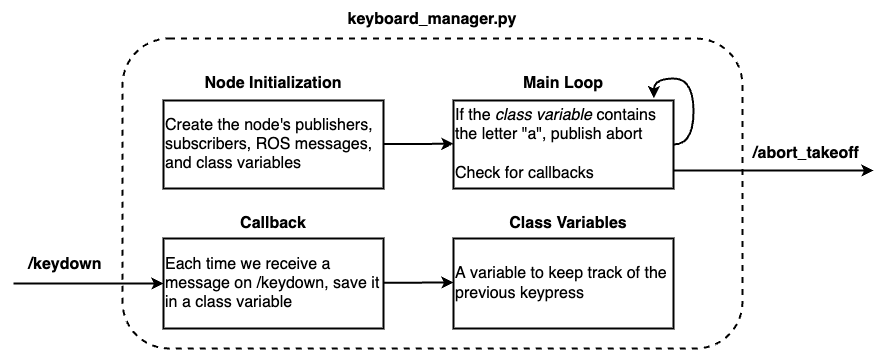
First, let’s think through how we want to design this node. We know that we want to publish /abort_takeoff messages to the rocket. We also know that we want to subscribe to /keydown messages that are published by the keyboard node. The goal of the node will be to process the /keydown messages, and if the letter “a” was pressed, send an abort message. We can see this design overview below:
You might be tempted to ask the question: “Why did we not just edit the source code of the keyboard node to publish abort messages directly?”. The answer is… we could have. However, this would defeat some of the decoupling benefits provided by ROS. For instance, if we make a mistake in our keyboard_manager node and it crashes, 1) no other nodes will crash, creating some fault tolerance, 2) we, as developers, know that the fault has to be inside that specific node, 3) when we look into that node to fix it, the node will be relatively simple as its implementation is on a single simple task, and 4) when we find a better keyboard node (i.e., one that support a larger character set) we can replace the existing one without modifying our code. Further, we may not always have access to the source code of a node. Some nodes are available to be installed as packages for your system which has several benefits. Having the package installed streamlines the compilation process by simplifying your workspace and allows your system software updater to automatically track updates.
Now let’s figure out how we will implement this node.
The first thing we note is that a key could be pressed at any time and potentially many times. Thus we will need to repeatedly check if the key is pressed. This continuous checking is implemented by having a main loop inside the node.
We noted earlier that ROS’s communication works asynchronously. That means that ROS messages can be published at any time without any coordination with the consumer. ROS handles asynchronous communication with “callback functions”. These are functions that we implement in the subscriber node, but are called automatically by ROS anytime a message is received in a subscribed topic (i.e. we never call them directly). We can then use variables to pass the information received by our callback into our main loop, which will determine which key was pressed and respond accordingly.
Graphically that would look like this:
We will now explore several portions of the Python code that we will need to implement. We provide a complete class definition with one TODO comment for you to fill in at the end.
Declare the Node:
Let’s figure out the implementation details for each of these sections. First, it is necessary to declare the node. To declare a node, we call the init_node function. This function registers the node with roscore, thus allowing it to communicate with all other nodes. For example:
rospy.init_node('keyboard_manager_node')
Class Initialization:
During class initialization, we create the publishers, subscribers, and ROS messages that we are going to be using.
To create a publisher, for instance, to send messages to our abort system, we use the command:
# rospy.Publisher(<Topic Name>, <Message Type>, <Queue Size>)
self.abort_pub = rospy.Publisher('/abort_takeoff', Bool, queue_size=1)
A publisher needs a topic name, what message type it will be sending, and queue size. The queue size is the size of the outgoing message queue used for asynchronous publishing.
To create a subscriber (e.g. to receive keyboard messages), we do the following:
# rospy.Subscriber(<Topic Name>, <Message Type>, <Callback Function>, <Queue Size>)
self.keyboard_sub = rospy.Subscriber('/keyboard/keydown', Key, self.get_key, queue_size=1)
Subscribers have function declarations similar to publishers, but there is one key difference: Subscribers require the name of the callback function. That is, every time this subscriber receives a message, it will automatically invoke the callback function get_key and pass the received message to that function through its parameter.
The last part of class initialization is to create the message we will be publishing. To create a message, we call the constructor of the message we want to create. In our case, we are using one of the standard ROS messages from the std_msgs package. More specifically, we are using the boolean message type, Bool (provided by ROS’s std_msgs). This message type has a single attribute data which is of the Python type bool. Message types will be covered more in the next lab, but one important note here is that ROS nodes can be implemented in both C++ and Python. This means that although Python allows variables to contain data of any type, in order to be compatible with C++, we must treat the message variables as if they are strictly typed.
from std_msgs.msg import Bool
# ...
abort = Bool()
Class Variables:
The class variable we will be using will take the key code from the callback and save it as a class variable. Doing this will give the entire class access to the variable. Creating a class variable can be done in Python using the self keyword. For instance:
self.key_code = -1
Callbacks:
Remember that ROS uses asynchronous communication. That means, at any time, our node could receive a message. To handle asynchronous communication, you need to create callbacks. You never call this function yourself, but whenever a message arrives, the function will be invoked. You want to keep callback functions as short as possible since they interrupt the execution flow of your main program. For instance, in our case, all we need to do is to save the key’s code from each keypress. To do that, we can create our callback function to take the ROS message and save it to our class variable.
def get_key(self, msg):
  self.key_code = msg.code
Main Loop:
Finally, in our main loop, we want to check if a keypress occurred. So for instance, if we wanted to check if the letter “b” was pressed, we can use the following code.
Note: By testing using the same method as above, we find ‘b’ has a value of 98. For most keys, the value is the same as the ASCII key code for that character. However, when writing software we want to avoid magic numbers in the code. In most keyboard libraries, this one included, you can use named constants instead. This improves readability of the code so that other developers can know what key you are checking for without consulting other sources.
# Check if "b" key has been pressed
if self.key_code == Key.KEY_b:
  # "b" key was pressed
  print("b key was pressed!")
When the correct letter is pressed, we want to set our abort message to true and publish it. Remember, our Bool message had a single attribute data, which was of the Python type bool. We thus use the following:
# Check if "b" key has been pressed
if self.key_code == Key.KEY_b:
  # if "b" key was pressed, publish abort message
  self.abort.data = True
  self.abort_pub.publish(self.abort)
In essence, if the Subscriber self.keyboard_sub retrieves a keycode from topic /keyboard/keydown that matches the “b” key, then the Publisher abort_pub publishes a Bool to the /abort_takeoff topic, that signals that the takeoff should be aborted.
Rate
In robotics, sensor data and other messages are often created or consumed at a set rate. For example, cameras will create images at a set frame rate, control commands are sent to the actuators at a fixed rate, and communication between two robots will have a specific frequency. ROS provides several constructs to support this requirement.
Let’s start with a simple example. Let’s say you want to read data from a sensor at 5Hz exactly. That means the entire execution loop needs to take precisely 200ms. The time to execute the code to process the data in the loop, however, varies from milliseconds to tens of milliseconds. Thus, to maintain exactly a 5Hz operating frequency, we would need to calculate in every loop iteration for how long to put the process to sleep.
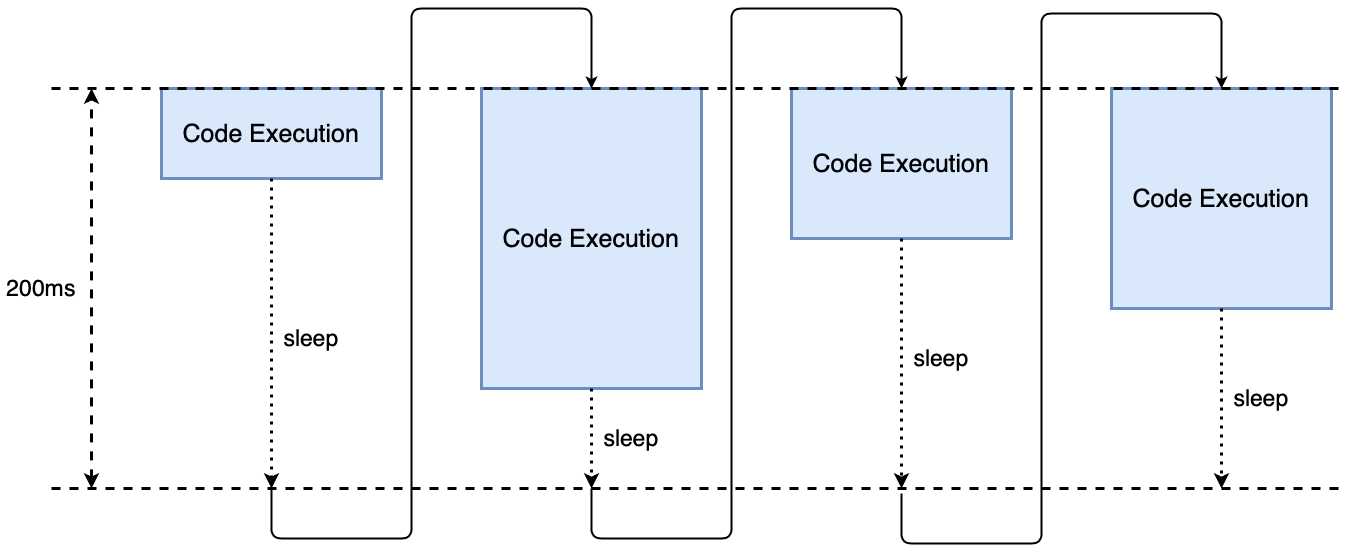
ROS makes setting a rate effortless. You create a ROS Rate with a given frequency in your code and use the sleep() functionality to force a wait until the next iteration. ROS Rate is different from a “simple” sleep functionality because it will dynamically choose the correct amount of time to sleep to respect the given frequency. Additionally, the ROS rate sleep() command allocates time for the callbacks created to be handled while the main loop sleeps. The complex task of dynamically setting the nodes rates and scheduling time for our callbacks to be handled is taken care of using the following lines:
# set the rate to 5Hz
rate = rospy.Rate(5)
while not rospy.is_shutdown():
  ...
  # Main loop
  ...
  rate.sleep()
Final Code:
Putting this all together, we get the final code. Note: there is a single piece you need to fill in marked with #TODO. Use what we learned from the keyboard section to complete this base code for keyboard_manager.py:
#!/usr/bin/env python
import rospy
from keyboard.msg import Key
from std_msgs.msg import Bool

# Create a class which we will use to take keyboard commands and convert them to an abort message
class KeyboardManager():
  # On node initialization
  def __init__(self):
    # Create the publisher and subscriber
    self.abort_pub = rospy.Publisher('/abort_takeoff', Bool, queue_size=1)
    self.keyboard_sub = rospy.Subscriber('/keyboard/keydown', Key, self.get_key, queue_size=1)
    # Create the abort message we are going to be sending
    self.abort = Bool()
    # Create a variable we will use to hold the keyboard code
    self.key_code = -1
    # Call the mainloop of our class
    self.mainloop()

  # Callback for the keyboard sub
  def get_key(self, msg):
    self.key_code = msg.code

  def mainloop(self):
    # Set the rate of this loop
    rate = rospy.Rate(5)
    # While ROS is still running
    while not rospy.is_shutdown():
      # Publish the abort message
      self.abort_pub.publish(self.abort)

      # Check if any key has been pressed
      if self.key_code == #TODO:
        # "a" key was pressed
        print("a key was pressed!")
        self.abort.data = True

      # Reset the code
      if self.key_code != -1:
        self.key_code = -1

      # Sleep for the remainder of the loop
      rate.sleep()

if __name__ == '__main__':
  rospy.init_node('keyboard_manager_node')
  try:
    ktp = KeyboardManager()
  except rospy.ROSInterruptException:
    pass
Testing the Keyboard Manager Node
Now that we have created the node, we need to test if it works. Let’s test if when the letter “a” is pressed on the keyboard, an abort is sent. Close all existing terminals and start four new terminals:
Terminal 1
cd ~/cs4501-robotics-docker  # edit the location if you did not clone the repository to ~ during Docker Setup
docker-compose exec ros bash
roscore
Terminal 2
cd ~/cs4501-robotics-docker  # edit the location if you did not clone the repository to ~ during Docker Setup
docker-compose exec ros bash
source ~/CS4501-Labs/lab2_ws/lab2_p1_ws/devel/setup.bash
rosrun keyboard keyboard
Terminal 3
cd ~/cs4501-robotics-docker  # edit the location if you did not clone the repository to ~ during Docker Setup
docker-compose exec ros bash
source ~/CS4501-Labs/lab2_ws/lab2_p1_ws/devel/setup.bash
rosrun rocketship keyboard_manager.py
Terminal 4
cd ~/cs4501-robotics-docker  # edit the location if you did not clone the repository to ~ during Docker Setup
docker-compose exec ros bash
source ~/CS4501-Labs/lab2_ws/lab2_p1_ws/devel/setup.bash
rostopic echo /abort_takeoff
Open the VNC Browser alongside Terminal 4 and click on the small ROS keyboard window. Press multiple keys on your keyboard, but avoid hitting “a”. You should notice that the messages published on the topic /abort_takeoff topic (shown in Terminal 4) are:
>>> data: False
>>> ---
>>> data: False
>>> ...
However, as soon as you hit the “a” key you should get:
>>> data: True
>>> ---
>>> data: True
>>> ...
Awesome, we have now created a system that monitors your keyboard and sends an abort command to our rocket after we press the “a” key!
Adding Keyboard Commands to our Rocketship
We just downloaded a keyboard node with the name keyboard in the keyboard package. We also created a node keyboard_manager with the name KeyboardManager in the rocketship package. Using what you learned from Lab 1, edit the launch file rocket.launch so that when we tell the rocket to take off, both the keyboard and the keyboard_manager are also run.
Checkpoint 1
Using the rocketship launch file, make the rocket take off. To confirm that you have done this correctly, use rqt_graph to display the computation graph.
- How does the computation graph differ from Lab 1? Why?
- Make the rocket take off and use a key (letter “a”) to abort the rocket. Does your rocket abort?
- What does each node publish or subscribe to?
Moving to Quadrotors
Let’s now switch from our toy rocket to a more realistic quadrotor. A quadrotor is a kind of X-rotor, where X=4, with interesting physical dynamics in that it is an unstable system that requires constant adjustments to fly. At the same time, its ability to hover and perform acrobatic maneuvers makes it appealing when precise trajectories are required. We will also refer to it as an unmanned air vehicle (UAV) or drone. Our quadrotor is built based on the dynamics of the FlightGoggles system, adapted to work within the constraints of our labs and simulator.
Simulator
Simulation is the favored way to test if the code is working correctly before running it on an actual robot. Below are some of the simulators available today.


We will be using a custom lightweight quadrotor simulator to learn key robot development concepts for the remainder of this class. Being “lightweight” means that it can run with very few system resources, but is low resolution – a tradeoff we have to make. Our quadrotor simulation platform is a also a heavily modified, pruned, and extended version of the FlightGoogles simulator. Even with these modifications, our version still maintains accurate quadrotor behavior.
Before we launch the simulator, we need to build the workspace that contains the simulator: lab2_p2_ws. Close all existing terminals and open a new one (Terminal 1). To build the simulator, run the following in Terminal 1:
cd ~/cs4501-robotics-docker  # edit the location if you did not clone the repository to ~ during Docker Setup
docker-compose exec ros bash
cd ~/CS4501-Labs/lab2_ws/lab2_p2_ws
catkin build
If everything builds successfully, you can launch the simulator by running the following command in Terminal 1.
source ~/CS4501-Labs/lab2_ws/lab2_p2_ws/devel/setup.bash
roslaunch flightcontroller fly.launch
You will notice we use a launch file to run the simulator. By now, you should start to understand how important launch files are. Take a minute and look at the launch file and try to determine what nodes are being launched. The launch file is located in ~/CS4501-Labs/lab2_ws/lab2_p2_ws/src/flightcontroller/launch/fly.launch.
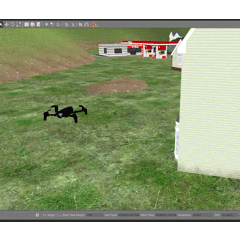
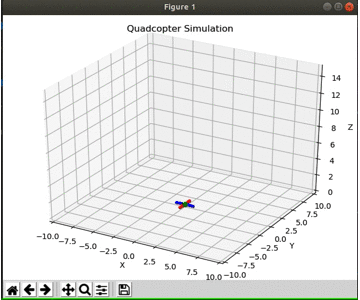
Once it is launched, you will see something like the image below in your VNC browser (if not already open, click here and connect). The green dot represents the center of the drone, while the blue and red lines represent the arms of the drone.
Extra tip: Next time you see a quadrotor, take a look at the arms or propellors’ colors. Generally, they are marked so that when you are piloting the drone, you can tell its orientation by looking at the different colors. You will also notice the under and over adjustments continually made by the drone to hover or translate to a waypoint.
Trouble?
There is a chance that instead of taking off and hovering, your drone might fly off the screen. This is often because your machine is unable to compute the drone control commands at the set frequency. You can imagine it as you trying to fly a drone but instead of giving it a command every 0.5s, you can only update the command every 5s. We have developed a workaround if you are running into this problem. Inside the drone configuration file, we have added a clockscale parameter. Currently, it is set to 1, i.e., everything is computed in real-time. By lowering it, you are slowing down the simulator’s world time, i.e. running everything in slow motion and giving your machine more time to compute the commands the drone requires to fly. If your drone is flying off the screen or looks unsteady, try lowering this value in increments of 0.1 until you find a workable solution. You can find the file at ~/CS4501-Labs/lab2_ws/lab2_p2_ws/src/flightgoggles/flightgoggles/config/drone/drone.yaml
flightgoggles_uav_dynamics:
    init_pose: [0.0, 0.0, 0.0, 0.0, 0.0, 0.0, 1.0]

    clockscale: 1.0
    vehicle_mass: 1.0
    vehicle_inertia_xx: 0.0049
    ...
If you are still struggling after adjusting this parameter, reach out to one of the teaching staff.
If your simulation has significant lag, it may be useful to test your computer with a simpler simulation (e.g. TurtleSim) before trying to adjust parameters in the drone simulator. A walkthrough of a TurtleSim demo is provided here.
Flying the drone
Now let’s try to fly the drone. We will be using a very similar process to that of Lab 1. In Lab 1, the rocket engine had a node that subscribed to the cmd_vel topic and to fly the rocket we published commands to cmd_vel. We are going to do exactly that here. Let’s see what topics are currently available. While the drone is hovering (i.e. keep Terminal 1 running), open a new terminal (Terminal 2) and list the available commands as per the list of topics:
cd ~/cs4501-robotics-docker  # edit the location if you did not clone the repository to ~ during Docker Setup
# Connect to the Docker container
docker-compose exec ros bash
source ~/CS4501-Labs/lab2_ws/lab2_p2_ws/devel/setup.bash
rostopic list
There should be several outputted topics, including the following:
>>> ...
>>> /uav/armed
>>> /uav/input/attitude
>>> /uav/input/position
>>> ...
Checkpoint 2
Use the source command to setup the environment variables for the workspace.
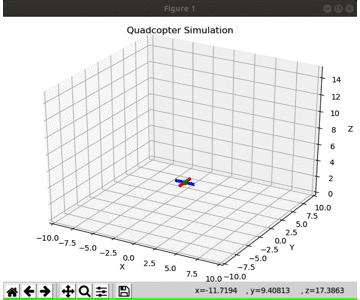
Using rqt_publisher, publish messages to /uav/input/position at 1Hz. Fly the drone using rqt_publisher, navigate it to the position (5, 5, 10) and take a screenshot of it at the final position. You should see something similar to this:
Note that the drone simulator re-renders over the rqt window at each cycle. For this reason, it may be difficult to manage both of these. To fix this, try resizing the VNC window until you can use both the simulator and rqt side-by-side. Instructions to do this were provided in the Lab1 instructions, found here in the section “Using Visual Applications.”
Flying with a Keyboard
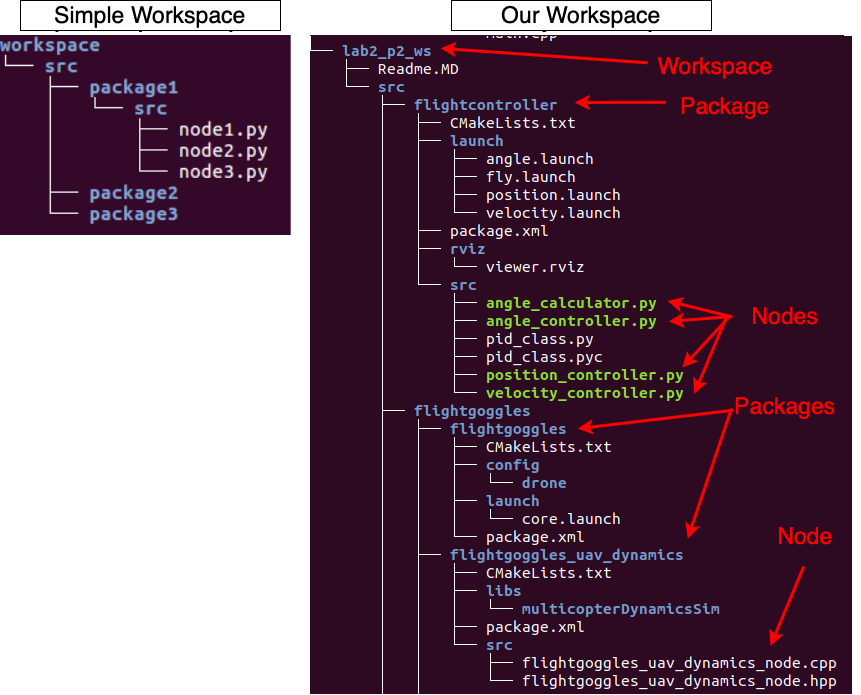
This lab’s final part is to get the drone flying using the arrow keys on our keyboard. The first step will be to download the keyboard package into this workspace. This will be your first time working independently inside your workspace. Remember that a workspace is a folder that contains all the files for your project. Inside the source folder of your workspace, you will find packages. Each package might contain ROS nodes, a ROS-independent library, a dataset, configuration files, a third-party piece of software, or anything else that logically constitutes a useful module. Inside each of the packages source folders, you will find each node’s source code. Below is an example of this lab’s workspace.
Close all existing terminals and open a new terminal (Terminal 1). Then connect to your Docker container:
cd ~/cs4501-robotics-docker  # edit the location if you did not clone the repository to ~ during Docker Setup
# Connect to the Docker container
docker-compose exec ros bash
Now, similar to the beginning of this lab, download the keyboard package into your current workspace. To do this, enter the following into Terminal 1:
# Go into the source folder of our workspace
cd ~/CS4501-Labs/lab2_ws/lab2_p2_ws/src
# Clone the keyboard package
git clone https://github.com/lrse/ros-keyboard.git
Once you have downloaded the keyboard package, make sure your workspace builds by running:
# Go back to the main directory
cd ~/CS4501-Labs/lab2_ws/lab2_p2_ws/
# Build the catkin workspace
catkin build
Earlier, we learned that the quadrotor could be controlled using the /uav/input/position topic. Now that we have added the keyboard package to the workspace, our next task will be to revise the “keyboard manager” node to use the keyboard’s arrow keys and fly the drone. We start by creating a new simple_control package:
# Go into the source folder of our workspace
cd ~/CS4501-Labs/lab2_ws/lab2_p2_ws/src
# Create a new package
catkin_create_pkg simple_control std_msgs rospy geometry_msgs
Next, create the keyboard_manager node using a similar process that we used earlier with the rocketship. Place the keyboard_manager inside the simple_control package. Once you have created the keyboard_manager code, open it for editing. We will provide you with some skeleton code that you need to complete. The sections you need to complete are marked using the comment #TODO.
To complete this code, use what you learned in the first part of this lab to identify keys and add them as if statements to the main loop. You can then update the self.pos parameter similar to how it is done in the __init__ function. (Note self.pos is of type Vector3, we will cover message types in later labs.) For this lab, all we require is that you move the drone in both the x and y direction.
#!/usr/bin/env python
import rospy
import time
from keyboard.msg import Key
from geometry_msgs.msg import Vector3

# Create a class which we will use to take keyboard commands and convert them to a position
class KeyboardManager():
  # On node initialization
  def __init__(self):
    # Create the publisher and subscriber
    self.position_pub = rospy.Publisher('#TODO', Vector3, queue_size=1)
    self.keyboard_sub = rospy.Subscriber('#TODO', Key, self.get_key, queue_size = 1)
    # Create the position message we are going to be sending
    self.pos = Vector3()
    # Set the drones height to 3
    self.pos.z = 3
    # Create a variable we will use to hold the key code
    self.key_code = -1
    # Give the simulation enough time to start
    time.sleep(10)
    # Call the mainloop of our class
    self.mainloop()

  # Callback for the keyboard sub
  def get_key(self, msg):
    self.key_code = msg.code

  def mainloop(self):
    # Set the rate of this loop
    rate = rospy.Rate(20)

    # While ROS is still running
    while not rospy.is_shutdown():
      # Publish the position
      self.position_pub.publish(self.pos)

      # Check if any key has been pressed
      # TODO

      # Reset the code
      if self.key_code != -1:
        self.key_code = -1

    # Sleep for the remainder of the loop
    rate.sleep()

if __name__ == '__main__':
  rospy.init_node('keyboard_manager')
  try:
    ktp = KeyboardManager()
  except rospy.ROSInterruptException:
    pass
Hint: It might be easier to launch the simulation, keyboard, and keyboard_manager in separate terminals for testing to quickly identify where any faults are coming from by looking at which terminal crashed. Remember: you must connect to the Docker container for each new terminal.
Note: Make sure that you click on the keyboard listener window in the VNC browser when attempting to control the drone. Second, since the keyboard listener only reports key_down once per keypress, holding down the arrow keys will not move the drone multiple times (in this implementation). To move multiple times in a single direction, you will need to press the same arrow key multiple times.
Finally, once you are done testing the basic functionality, add these lines to the end of the launch file (~/CS4501-Labs/lab2_ws/lab2_p2_ws/src/flightcontroller/launch/fly.launch) so that you can run the code using a single command. After adding the two new lines, the launch file should look something like this:
<?xml version="1.0"?>
<launch>

  <include file="$(find flightgoggles)/launch/core.launch">
  </include>
  ...
  <node name="keyboard_manager_node" pkg="simple_control" type="keyboard_manager.py" output="screen" />
  <node name="keyboard" pkg="keyboard" type="keyboard" output="screen" />
</launch>
Checkpoint 3
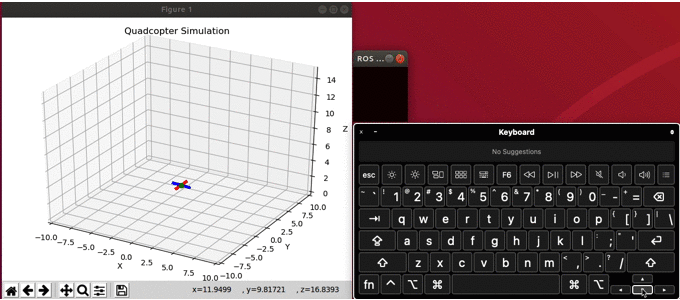
Demonstrate that you can launch the quadrotor simulator, keyboard node, and keyboard manager using a single launch file. Subsequently, show that you can fly the quadrotor around using the arrow keys on your keyboard. Below is a sped-up example of how your demonstration should look. (Note: This video is sped up and shows a virtual keyboard. For your demonstration, use your computer’s keyboard.)
Congratulations, you are done with lab 2!
Final Check
At the end of this lab, you should have the following:
- Use
rqt_graphto display the communication graph for the updated rocketship.- How does the computation graph differ from Lab 1, and why?
- Using your keyboard, abort the rocket.
- What does each node publish or subscribe to?
- Use
rqt_publisherto fly the drone to the position (5, 5, 10) and take a screenshot of it - Launch the simulator using a launch file and fly around using the arrow keys.
- What improvements would you consider implementing in your controller?
Extra: Here is some information on launch files.