Your final architecture can differ from the one we provided as long as the key nodes requested are implemented and your code does not attempt to obtain any other data from the provided nodes.
Looking back
During the course of the semester, we have learned about different aspects of building robotics systems:
- Basics of ROS Development and Tools
- State representation
- Communication protocols
- Sensors and error correction
- Programming deployments
- Environment perception
- PID controllers
- Testing robots
- Mapping and motion Planning
- Transforming coordinate frames
We will use all of these skills to develop a robot system that is capable of performing a complex task autonomously.
Motivation
Robots tend to excell in jobs that meet the four Ds: Dangerous, Dull, Dirty, and Dumb. We want to protect human from dangerous jobs that can be carried out by expendable robots. Dull and repetitive tasks can be automated for robots; robots can have a longer “attention span” and endurance, and we can build actuators and joins that are well suited for repetitive motion where human joints are not. Similarly, dirty tasks can be performed by robots that can work in a wide range of environments that are not human friendly.
In this lab, we will be developing a robot for a dangerous and dirty task, attempting to perform a urban search and rescue mission in harsh conditions caused by a disaster (as is being done in Fukushima). One of the earliest documented use of robots in this space was in the aftermath of 9/11, and since then research for this type of robot has greatly increased.
Skipper in Rubble
There has been a natural disaster that has yielded an area full of rubble that is not safe for humans to access as shown in the picture below. Previous crews were able to evacuate everyone from the site and there have been no causalities reported. However, the last person to be rescued said their dog, Skipper, ran away in the commotion and was left behind in the rubble. Your task is to send your drone in to rescue their dog Skipper.

Your drone is equipped with a rescue basket to pick up the dog, a down-facing LIDAR, and a down-facing camera.
You also have access to a rough map of the areas prepared by the previous rescue crews to know where the drone can fly, but they note that ground conditions are causing for several fires to crop up that are not in the map.
Luckily, the dog’s collar is equipped with a GPS tracking device, and so the rescuers are able to use their satellite to roughly detect where the dog, though it only receives updates periodically.
Your drone can only travel short distances with the dog onboard and cannot leave the confines of the map.
Once you pick up Skipper, you must travel to a safe landing spot that you identify in the rubble and then wait for rescuers to come to your position.
Mission Specifications
Your main objective is to build a system to safely navigate your drone amid the rubble and fire, find and pick up Skipper, and then land in a safe location.

To achieve your mission your must:
- Access the satellite data to get Skipper approximate location
- The satellite will provide you the last-known location of the dog once every 30 seconds.
- The satellite reports the dog position in its own coordinate frame, so you must use the transform it provides to convert it to the world frame.
- Safely navigate around obstacles to reach Skipper
- Utilize the 100x100 map that the previous crew provided to avoid high obstacles in the rubble, marked with yellow barrels by the previous rescue crew.
- Develop a global planner to generate a path through the map that will reach the dog without hitting any obstacles
- Employ the drone’s down-facing camera to detect any fires that may have developed
- Once a fire is found that is on your path, you must switch to a local planner to avoid the fire, then get back to the previous global path or invoke the global planner again. Keep in mind that invoking global planners is expensive in big maps so you may not finalize the mission if you just use a global planner.
- Since Skipper is a runner, it is likely that by the time you reach its satellite reported location it will not longer be there and your drone will have methodically search the area to find it or wait for another satellite report.
- Pick up and Landing
- As you navigate, you must use your down-facing LIDAR to look for a spot that is flat enough to safely land with the dog. To land the drone, you will need a minimum of a 1m x 1m square (one map block) that has been evaluated as safe.
- Once Skipper is within 5 meters of the drone (discluding the distance in z), Skipper freezes, and once you are within 1 meter the rescue basket will descend to pick it up.
- Once Skipper is in the basket the drone should navigate to the closest safe landing spot. If you pick up the dog before finding a safe spot, you must find one before the timeout period for the mission runs out.
All these tasks must be accomplished within a 120-second timeout period. Once the timeout period runs out, the drone battery is exhausted and the mission will end in a failure.
You will know that the timeout period has ended by warning messages published on the mission_monitor topic, described in detail below.
Before diving into the code, you might want to first draw out a state machine to identify the system states and the transitions between states, as those will constitute the bases for your design.
To get an idea of what the known obstacles will look like, refer to this sample map and corresponding image of the terrain:


Project Setup
The project builds off of the previous labs that we have done, but leaves much more room for you to implement and make your own design decisions. Instead of providing partial source code with labelled TODOs, we outline the data available for you and loosely where you should implement the remaining portions of the project.
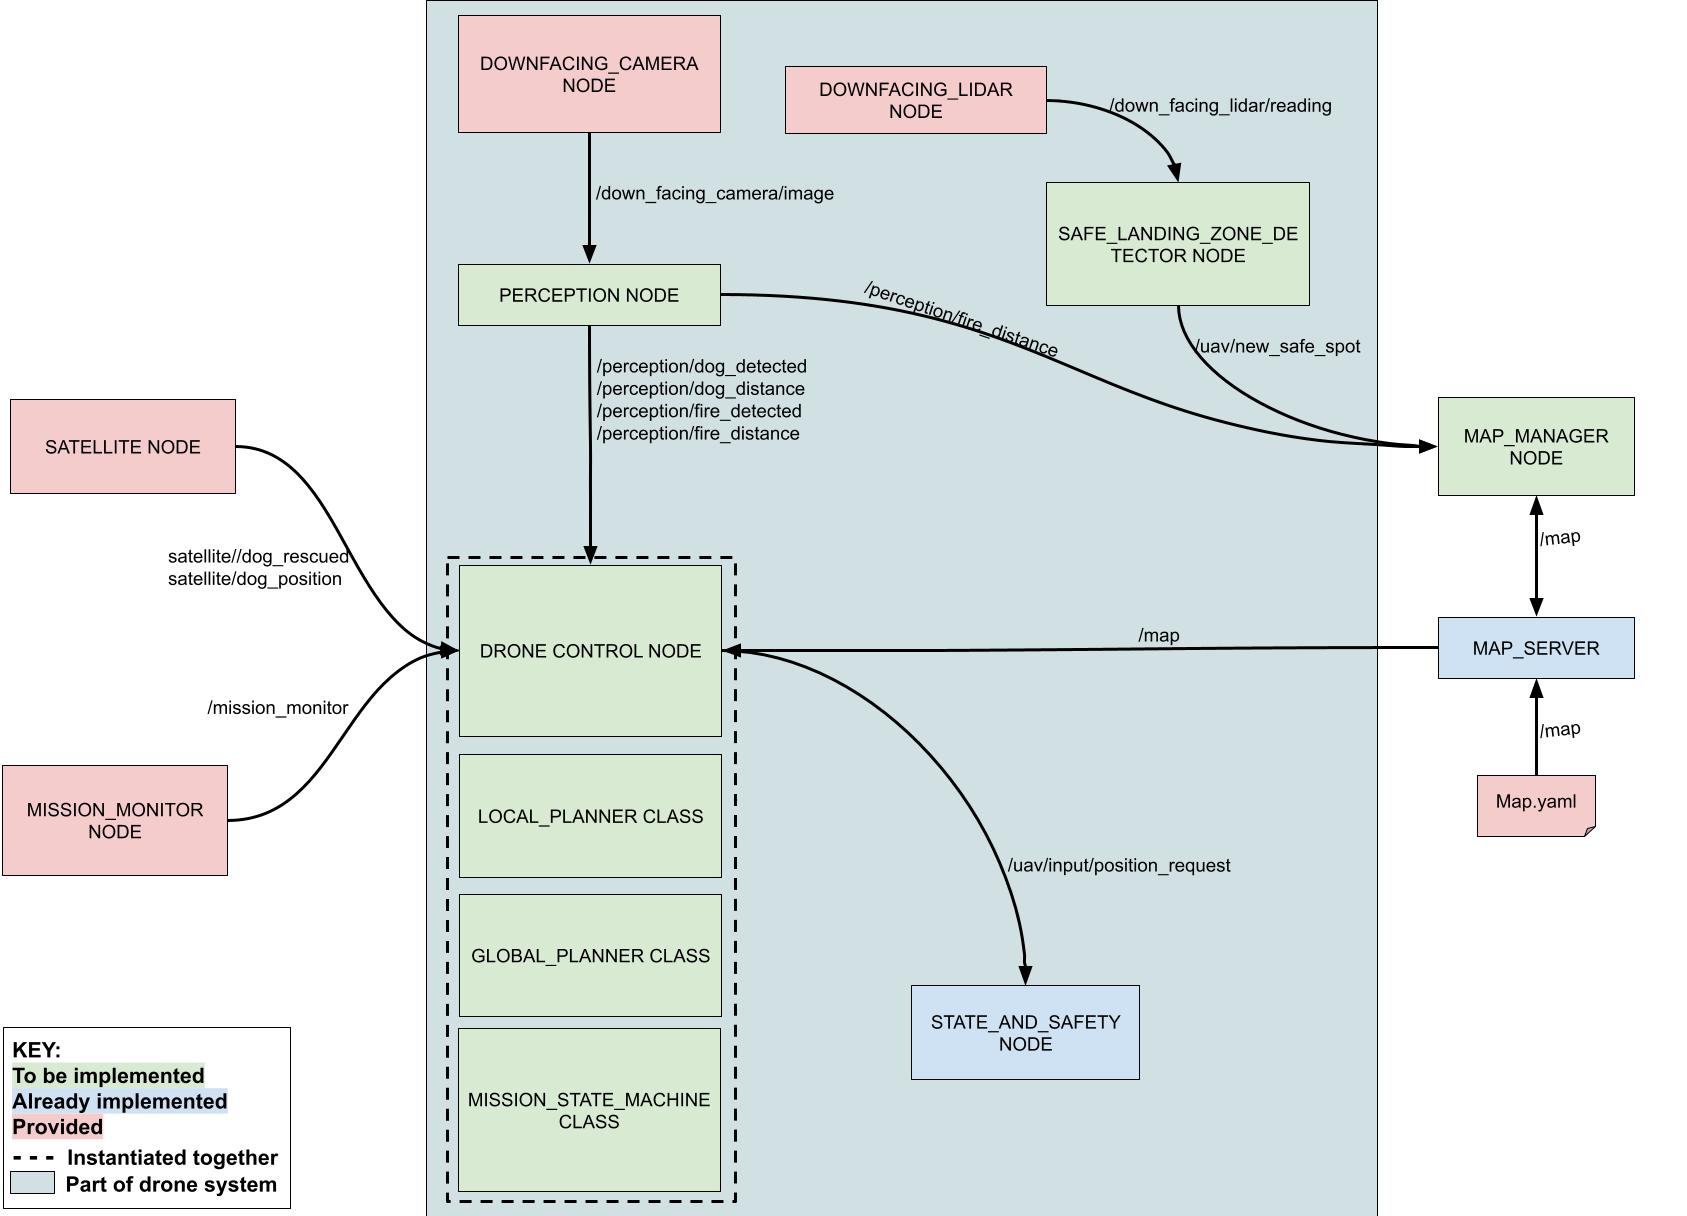
Below is the tentative architecture for the project. Nodes and classes considered in the drone are contained by the teal background.
To retrieve the new code base for the final project, run:
$ cd ~/Desktop/CS4501-Labs
$ git pull
Project Architecture
Nodes and Topics Provided
The satellite node tracks the state of the dog throughout the mission and regularly publishes /satellite/dog_position.
The mission_monitor node determine whether the drone has crashed into an obstacle, fire, attempted to land in an unsafe zone, or the timeout has been reached. If it has, thisnode publishes a warning message specific to the type of failure:
FIRE, OBSTACLE, UNSAFE_LANDING, and TIMEOUT.
If the drone has completed the mission within the timeout and without other warnings, a success message is published containing the time taken to complete this run.
The provided downfacing_lidar node supplies single distance to the group reading directly below the drone, and so you will need to be flying in order to get readings of the surface. It uses the drone’s downward facing laser. This laser sends out a single beam that goes directly towards the ground. It is attached to a gimbal and thus ignores the orientation of the drone (it always points directly to the ground at 90 degrees).
The map_server provides a map of known obstacles generated by the previous rescue crew. The known obstacles do not include the dog, safezones, or fires.
| Topic | Text Description | Your task |
|---|---|---|
/satellite/dog_position |
The dog’s last known position in the satellite frame |
Transform into world frame and navigate |
| TF Transforms | Provides a transform lookup between coordinate frames in the system | Lookup the dynamic satellite to world transform each time you receive data |
/down_facing_lidar/reading |
The LIDAR reading from the down-facing LIDAR | Find a flat space that the drone can land in later |
/down_facing_camera/image |
The Image from the down-facing camera | Locate fires to safely avoid them and the dog to rescue him. |
/map |
The map generated by the previous rescue crew showing known obstacles (demarcated by barrels in the downfacing camera) | Generate paths through the rubble while avoiding obstacles |
Your drone_controller node
The drone control node must combine the functionality of the local planner class, global planner class, and mission state machine to determine the next move of the drone. It takes in topics from the satellite, perception node, map manager, and mission monitor node in order to do so.
When creating the messages you will publish on the topics below, you can use by any of the information provided by the stubbed subscribed topics in drone_controller.
However, you may not subscribe to new topics when implementing your node.
| Topic | Text Description | Your task |
|---|---|---|
/uav/input/position_request |
Commands the drone to fly to a location | Use the global/local planner to command the drone’s next movement |
Your perception node
The perception node is used to find the dog and fires in the camera images
provided in downfacing_camera/image topic. The dog and the fires are not part of the provided map. The perception node must publish whether or not the object has been detected and the coordinates in the world frame.
Note that at 9m altitude, 30px is a 1m by 1m block (one map block). If you plan to change your drone altitude when searching for the dog, account for that with your perception. Note that below 0.5m the drone’s camera cannot produce a viable image.
You are allowed to use whatever perception method you prefer to detect them, as long as your code is explainable and functional. Check the test cases offered by fp_ws/src/perception/src/debug_detection.py for a better understanding of the functionality you will need to implement.
When creating the messages you will publish on the topics below, you can use by any of the information provided by the stubbed subscribed topics in perception.
However, you may not subscribe to new topics when implementing your node.
| Topic | Text Description | Your task |
|---|---|---|
/perception/dog_detected |
Used to inform drone_controller the dog is present in the image from down_facing_camera. |
Publish a boolean of whether the dog is in view |
/perception/dog_distance |
Used to inform drone_controller of the dog’s location in the world frame. |
Publish a Vector3 of the location |
/perception/fire_detected |
Used to inform map_manager and drone_controller nearby fires are present. |
Publish a boolean of whether fires are in view |
/perception/fire_distance |
Used to inform map_manager of fires’ locations in the world frame so it can update the map and drone_controller to trigger local planning. |
Publish an Int32MultiArray of the location(s) of new fires |
Your safe_landing_zone_detector node
Most of the terrain is unsafe for landing. Areas with rubble are unsafe and will cause the laser to behave erratically when moving over an area. By contrast, the flat spots are safe to land and are easily identified through the laser. The figure below gives sample readings from the laser being directly above both a safe spot and an unsafe spot. Remember that the laser consists of a single beam down to the surface, and thus to get multiple readings, the drone will need to be moving. You must use these readings to determine where the safe spots to land are located. You can assume that each safe spot is 1m by 1m in size.
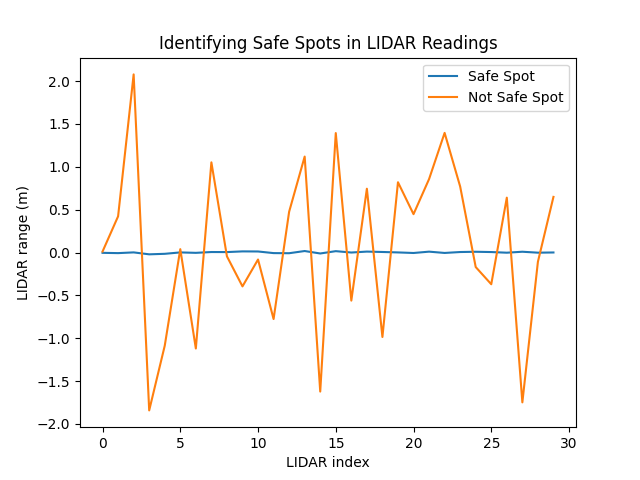
The goal of the safe_landing_zone_detector is to use these reading to determine where it is safe to land. A safe landing spot will be flat and smooth, that is, the variance in readings obtained while flying will be less than 0.05. If the variance is greater than this, you are flying over rubble and the drone will not successfully land.
When this node detects a safe landing zone, it will publish that to the corresponding topic.
When creating the messages you will publish on the topics below, you can use by any of the information provided by the stubbed subscribed topics in safe_landing_zone_detector.
However, you may not subscribe to new topics when implementing your node.
| Topic | Text Description | Your task |
|---|---|---|
/uav/new_safe_spot |
Used to inform the map_manager of a new safe spot so it can update the map |
Publish a Vector3 of the location of the new safe spot location in the world frame |
Map Manager Node
The map_manager node relies that a map is published and takes in the positions of new fires and safe spots from other nodes and updates the GridOccupancy map used by the drone to keep track of the obstacles, fires, and safe landing zones it has encountered, to plan its search, and to plan its route back to a safe landing zone.
The design of the map manager is left up to you, and can be implemented however works for you as long as it is explainable and functional.
Local Planner Class
The purpose of the local_planner class is to avoid obstacles that are not on the map, namely fires.
You may implement this class however you like with what you’ve learned from previous labs, but it cannot use information from topics other than those stubbed out in the drone_controller node.
Global Planner Class
The purpose of the global_planner class is to plan a path to a goal. Depending on the mission state, that goal is determined by the dog’s location or the location of the nearest accessible safe landing zone.
You may implement this class however you like with what you’ve learned from previous labs, but it cannot use information from topics other than those stubbed out in the drone_controller node.
Mission State Machine Class
The mission_state_machine class can use any of the variables available to the drone_control node to determine the mission state.
The basic states have been stubbed for you but it is up to you to determine when the drone enters a new mission state, or whether new states need to be added. If you add new states, you must justify why they were needed.
You may implement this class however you like with what you’ve learned from previous labs, but it cannot use information from topics other than those stubbed out in the drone_controller node.
Project Evaluation
Your project will be evaluated on your ability to meet the following requirements and explain your code thoroughly to the teaching staff.
- The drone must never collide with an obstacle or fire (Automatically detected)
- The drone must find the dog and land in a safe spot within 120 seconds (Automatically detected)
- The drone cannot go outside the map. (Detected in rostests)
The checkpoints for this project are designed to be checked off as you go, ensuring steady progress towards the final deliverable.
You should be able to get Checkpoint 1 done within the first week, as they are a retread of previous labs. This is partly to pace your work, and partly to make sure you get time to demo everything. The final due date of TUESDAY, MAY 4TH is a hard deadline, so plan ahead so you aren’t scrambling to finish everything at the last minute.
The final project is worth 20% of your class grade. The grading breakdown is:
- 5 points for Checkpoint 1
- 5 points for Checkpoint 2
- 10 points for Checkpoint 3
Checkpoints are due by their specific due date to receive full credit. Showing the Checkpoint 3 doesn’t count as checking off all the checkpoints.
Checkpoint 1 (due April 27th)
Checkpoint 1.1 – State Machine
-
Draw a diagram of your state machine. Under what conditions does it transition between states? How have you accounted for all possible states?
-
Write a series of unit tests simulating input to show that your state machine can handle various types of missions (e.g. finding the dog before or after finding a safe zone, reinitiating the global search if the dog is lost from the drone camera view or never enters the drone camera view, …)
Checkpoint 1.2 – Dog Perception
-
Show that your perception strategy works on the test images provided for both detection and offset by running
fp_ws/src/perception/src/debug_detection.pyfor your implementation of theDogDetectionclass. -
Justify your choice of perception strategy, and explain the circumstances under which it might fail.
-
Under those failure conditions, how might you modify your strategy or supplement it with another strategy?
Checkpoint 1.3 – Safe Landing Zone
-
Use your global planner, a waypoint follower, or publish messages from the command line to have your drone fly around
map2.yaml. Show that the map is updated accordingly to find the safe zone. -
Verify that the safe landing zone corresponds with the image you see on the topic
/down_facing_camera/image. There shouldn’t be any junk or big rocks in the spot.
Checkpoint 1.4 – Global Planner
-
Showcase your drone passing the rostest we’ve provided in
fp_ws/src/system_tests/src/drone_behavior_test.py. -
Come up with a second test that extends the provided rostest. What functionality does it exercise that the original test did not?
-
Come up with a map of your own design to showcase your global planner. Your drone can ignore fires while traversing this map.
-
Write a set of rostests to showcase your global planner navigating towards a goal on this new map. Be able to explain your choices when designing the tests.
Checkpoint 1 items that are not satisfied by the due date, will get 50% credit if completed by Checkpoint 2.
Checkpoint 2 (due May 4th)
Checkpoint 2.1 – Fire Perception
-
Show that your perception strategy works on the test images with fires provided for both detection and offset by running
fp_ws/src/perception/src/debug_detection.pyfor your implementation of theFireDetectionclass. -
Justify your choice of perception strategy, and explain the circumstances under which it might fail.
-
Under those failure conditions, how might you modify your strategy or supplement it with another strategy?
Checkpoint 2.2 – Local Planner
-
Write a set of rostests to showcase your local planner avoiding a fire in
map2.yamlormap3.yaml. Be able to explain your choices when designing the tests. -
How might you change the design of your local planner if the fires were moving?
-
Show that your global planner and local planner can work together to traverse a map towards a goal with both obstacles and fires in its path.
Checkpoint 2 items that are not satisfied by the due date, will get 50% credit if completed by office hours that follow until May 7th.
Checkpoint 3 – Presentations (due May 6th)
- Showcase your project working end-to-end to rescue the dog within a timeframe of 120 seconds.
- Take video showing that it succeeds 3 out of 3 times within the timeout on 3 different maps. See the
fp_ws/src/flightcontroller/mapsdirectory for different maps.
- Take video showing that it succeeds 3 out of 3 times within the timeout on 3 different maps. See the
- Put together a 3-minute presentation of the functional drone executing its mission, your design choices, and an overview of the easy and difficult aspects of this lab for you. Make sure your presentation answers the following questions:
- How does your state machine move between the various states of the mission?
- How did you handle perception, local planning, and global planning?
- What were the most challenging aspects for you (design, implementation, writing tests…)?
- Include the videos you took in part 1. You can speed up the videos to fit them within your 3-minute presentation time.
Congratulations, you are done with the final project and CS4501-002: Software Engineering for Robotics!